Home

This is How I Made the Site

Below is an example of how I made this site. The site was made using Prismic as part of their #slicecontest. You will notice a lot of the changes I made to the images are using an API that is part of imgix. Prismic does natively use imgix for their images for sizes, compression, formatting, & responsive design. But there are a lot of tricks you can do around styling & design to the image as well. Below, you will see explanations of how I applied this using the imgix API in conjunction with Prismic.

Creating Polaroid Style Images

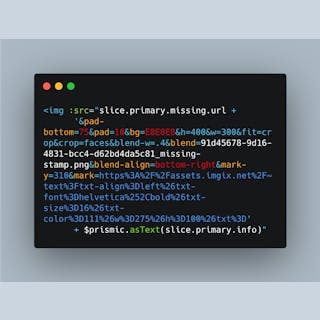
I wanted to create polaroid style photos. They are actually pretty simple to make, you can just add padding around the photo, but the key is that on the bottom the padding needs to be larger. You can certainly use css to do this, but I wanted to do this with imgix so the image that is indexed later in google still looks like this. I set a general padding number, then a larger pad-bottom number, and then declared what color I wanted these padded areas to be. Below is the imgix API I used to create the padding to make it look like a polaroid photo:

 pad-bottom=75&pad=10&bg=E8E8EB 

Text as Part of the Image for Indexing

It was important for me to create an image that not only contained the image of the missing child, but I wanted the image to also contain important text such as name, location, contact info. I always though image for missing children should always contain this info, that way no matter where you see them, you will still see this important info. It's important to differentiate an image with text as part of the image and text placed on top of it using css. When an image is indexed in google, it loses the text placed on top with css, but images with text as part of the image will remain in a google indexed image. I am creating a watermark in imgix in the bottom section of the polaroid, then I am filling the text from the prismic field in the slice called info. Here is an example:

 txt=" + $prismic.asText(slice.primary.info)